Blog about drupal tutorial as it is written on the identity arithok blog will soon begin. About CMS drupal itself, has a lot of content or blogs that discuss strengths when compared to other CMS. Flexible and powerful, two words that I often use when people ask about drupal:). Without the wide long-winded, I started with the following article drupal 6 installation. Oh yes, drupal tutorials on this blog will arithok directly discuss the drupal version 6, and chances are, the blog will not discuss arithok drupal previous versions, since the focus is on the development drupal 6 even, drupal 7 also has developed rapidly.
Initial step before the installation of drupal 6 is to make sure your computer is equipped with a localhost. What is localhost, and how to make the localhost, you can see it on this blog under the title Making arithok Localhost with XAMPP Installation. As in these blogs, XAMPP installation location is in the folder c: / xampp /. If the location of your XAMPP installation folder is different, you can adjust itself when placed drupal files.
Here are the steps in the installation of drupal 6.Download the file from drupal.org drupal

Drupal 6 version which can be downloaded in drupal.org when this tutorial was made 6:14 drupal. When you download it on drupal.org, you'll get the files to install drupal form:
drupal-6.14.tar.gz
These files are compressed files tar.gz. form You must open it first. You can use some software, for example you can use 7-zip. To download, please access http://www.7-zip.org/ URL address. Unpack / unzip / decompress the file, and put the folder drupal-6:14 to location c: / xampp / htdocs /
Rename the folder drupal-6:14
Rename the folder drupal-6:14 a site name that you want, for example, converted into drupalku. Change the name of this folder will affect the site's URL address in the localhost when you will access via a browser. URL address at localhost to http://localhost/drupalku/
The next step before the installation Drupal 6 is a new database to accommodate data of drupal 6 installation. To make it, you can use phpmyadmin which is available when you create a localhost with XAMPP. Open your browser, then access http://localhost/phpmyadmin/. A little additional explanation, there are some inherent database when making the localhost. The names of the default database comes from XAMPP installation you can see on the left like phpmyadmin, mysql and others.
To create a new database, look at the window on the right. There was a small form with writing on it Create New Database. Please enter the name of your database, for example ari_drupalku. The dropdown menu next to his right, let remain as the default setting of Collation. Then click the Create button.
If successful, you will be taken to a new database pages that have been so. You can see on the left, ari_drupalku database name already exists, but the numbers in parentheses 0 indicate that there is no database or data tables in it. This database will be automatically filled in data when Drupal 6 installation process is run. 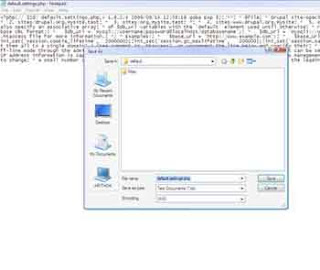
The final step is to prepare the settings.php file to the database and drupal files in XAMPP can be connected. Go back to your windows explorer, then go to the c: \ xampp \ htdocs \ drupalku \ sites \ default \.In this folder you will find a folder named files and a file named default.settings.php. We will create a settings.php file by copying the files default.settings.php. Way, open the file with notepad default.settings.php. Default.settings.php file right click and select open with notepad. Once open, click the File menu, and select Save As. Change the name to save default.settings.php settings.php, and then below it, change the form save as type to All Files. After that press the Save button. Settings.php file is created and automatically placed in the right place, which is located at the default.settings.php.
Edit settings.php
Now we edit it to customize the database name and the name of the site URL address that we will create. As I mentioned in the first sentence, there are two parts that you need to change in this settings.php file.
=>Enter the user name, password and database name
This step aims to file the installation of drupal 6 can connect to the database that you created earlier. To make it easier, we will use the Find facility in this Notepad editor. Put your cursor at the beginning of this text file by clicking on the top left corner before the Find.
Enter the word $ db_url = 'mysql: / / username: password @ localhost / databasename'; and press the Find Next button. When you click the Find Next button, you will find the results of the first text. The first text was hoping to let it go, because this text was not to be changed. Text / first script serves as an example, comes from drupal. Click Find Next once again. Once found, close the box Find. This section we will edit. Text / scrupt is located adjacent second (could also above if you use an editor other than Notepad)
$ db_prefix. Edit this text from
$db_url = 'mysql://username:password@localhost/databasename'; --> $db_url = 'mysql://root:@localhost/ari_drupalku;
Here's a little explanation of what you change:
username -> root (user name for the default database of XAMPP installation is the root.)
password -> (the password for the default database of XAMPP installation is not using a password, emptied it, remember, vacated, no spaces).
databasename -> ari_drupalku (name of the database you created earlier included here.
When finished changed, press the button on your keyboard Ctrl + S to save the changes, or you can do through the menu with the click Notepad File menu> Save.
=>Entering a URL address
The second part will be changed in settings.php file is a URL address. Way as the first step when the change / enter a user name, password and database above. Put your cursor at the beginning of this text file with the way in the upper left corner or before Find.
Enter the word
"# $ base_url = 'http://www.example.com'; / / NO trailing slash!". Once found, close the search results box, and edit the http://www.example.com ->
http://localhost/drupalku
Then press the button on your keyboard Ctrl + S to save the changes, or you can do through the menu with the click Notepad File menu> Save.
Done. Files are finished editing settings.php.
Installing
drupal 6 via a browser
Drupal file is ready, the database is ready, it's time to install
drupal via a browser. Open your browser and enter the URL address
http://localhost/drupalku/install.php
Entering the
drupal 6 installation process via a browser, the first time you will be faced with the display language options, select only Install
Drupal in Bahasa Indonesia.
Wait a minute, the database installation process is running.
The next display is the Configure Site
Here is an explanation of each section:
By default, the file permissions will be changed settings.php during the installation of
drupal via the browser, it's for security reasons. All necessary changes to. / Sites / default and. / Sites / default / settings.php have been made. They have been set to read-only for security.
The first part that you need to fill the Site Information.
- Site Name -> insert name of your site in this form, for example Drupalku. Site name will appear in the upper left corner side by side with drupal logo.
- Site e-mail address -> enter your email address here for site administration purposes.
The next section is the Server Settings
- The default time zone. This form serves to set the time to be used on the site. I suggest let alone keep the default, because this is automatically adapts to your computer.
- Clean URLs This section is important enough for the Disabled (Enabled). Clean URLs will make your site URL into a neat and more familiar to humans and search engines. Default drupal when Clean URLs disabled or is not active, the URL will be used on the site will always use? Q =. This is clearly difficult for visitors to remember our URL address, it was for the search engines something undesirable. Select Enabled Clean URLs for this section. Additional information, using XAMPP, you support the use of localhost url is clean.
Complete Instalation
drupal
In the next display will appear a message that the installation process is completed. (
Drupal installation Compete). However, there is a red warning, snippets following:
warning: mail () [function.mail]: Failed to connect to mailserver at "localhost" port 25, verify your "SMTP" and "smtp_port" setting in php.ini or use ini_set () in C: \ xampp \ htdocs \ drupalku \ includes \ mail.inc on line 193.
Unable to send e-mail. Please contact the site administrator if the problem persists.
This warning is normal because you've installed
drupal in localhost, localhost is not connected to the internet. This warning explains that the email function does not work and resulted in sending an email to an administrator account failed. This does not matter, when your site is online, email function will work well. You can ignore this warning. You can see the writing underneath that provide safe, that
Drupal has been successfully installed. Please proceed to your site pages by clicking on the link your new site.
Welcome to your new drupal. You automatically are logged in as admin, in accordance with the administrator user name that you entered earlier. The next tutorial I will explain the parts of drupal so you better understand their respective functions.


